
Setting up Single Sign On (SSO) with Microsoft 365 / Entra
This guide walks you through the process of setting up Single Sign-On for Leave Dates using Microsoft 365/Entra.
Single Sign-On allows your staff to have one password for all their applications, eliminating the need to log on separately to different systems.
How to configure single sign-on with Microsoft 365
Follow these steps to create the app registration:
- Sign in to the Entra admin center
- If you have access to multiple directories, click your avatar in the top right corner to Switch directory to the directory in which you want to register an application.
- On the left navigation menu go to Identify > Enterprise Applications
- Click the link in the header for Application registrations
- Click + New registration.
- Enter Leave Dates SSO for the application name.
- Specify who can use the application, sometimes referred to as the sign-in audience as Accounts in this organizational directory only (single tenant)
- Don't enter anything for Redirect URI (optional), you'll configure one in the next section.
- Select Register to complete the initial app registration.
- When registration completes, the Azure portal displays the app registration's Overview pane, which includes its Application (client) ID. Also referred to as just client ID, this value uniquely identifies your application in the Microsoft identity platform. Copy this value, it will be used later.
- Under Manage, select Branding
- Upload the attached file as a logo
- Ignore the Home Page URL, this will be filled in later.
- Enter https://www.leavedates.com/our-terms-of-use/ as the Terms of Service
- Enter https://www.leavedates.com/privacy-policy/ as the Privacy Statement
- Copy the Publisher domain, this will be used later.
- Press Save
- Under Manage, select Certificates & secrets
- Select + New client secret
- Add a description (optional) and choose the expiry period. Make a note to renew the certificate before the expiry date.
- Click Add
- Copy the Value you just created. It will be shown in the table. (be careful to select the Value rather than the ID)
- Open a new tab in your browser and log into Leave Dates using your admin account. You will be using the Microsoft tab again later.
- Navigate to the Settings > Integrations page
- Click the Add single sign on button within the Single sign on section
- Select Microsoft as the Provider
- Provide a Company domain for the login process (eg. https://companyname.leavedates.com). Choose something memorable and easy to type, such as companyname. It will be used later to automate the login process. You cannot change this later so choose wisely. If you are not asked for this, that is because you have previously entered a subdomain which will be used.
- For Tenant, paste in the value copied in step 16 above (Publisher domain). This will be similar to companyname.onmicrosoft.com
- For Client ID, paste in the Application (client) ID copied in step 10
- For Client secret, paste in the Value copied in step 22
- Press Add provider
-
An entry will be added to the table, as shown below.
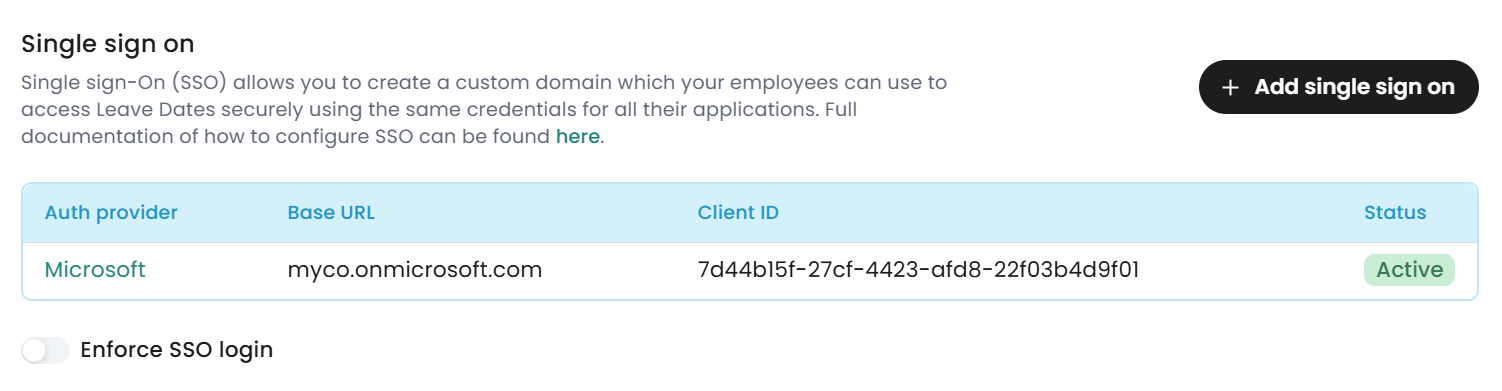
- Click the row to open the details panel.
- Copy the values for Login Url and Callback Url from the table and revert back to the Microsoft browser tab.
- In the Overview page, click on Add a Redirect URI
- Click + Add a platform
- Select Web and paste the Callback Url (copied in step 34) into the Redirect URIs field. Click Configure to save.
- Click + Add a platform
-
Select Mobile and desktop applications, paste in the below URI, and click Configure to save.
com.nortonfive.leavedates://callback
- Under Manage, select Branding
- Paste the Login Url (copied in step 34) as the Home Page URL
- Click Save
- The single sign on application configuration is now complete.
-
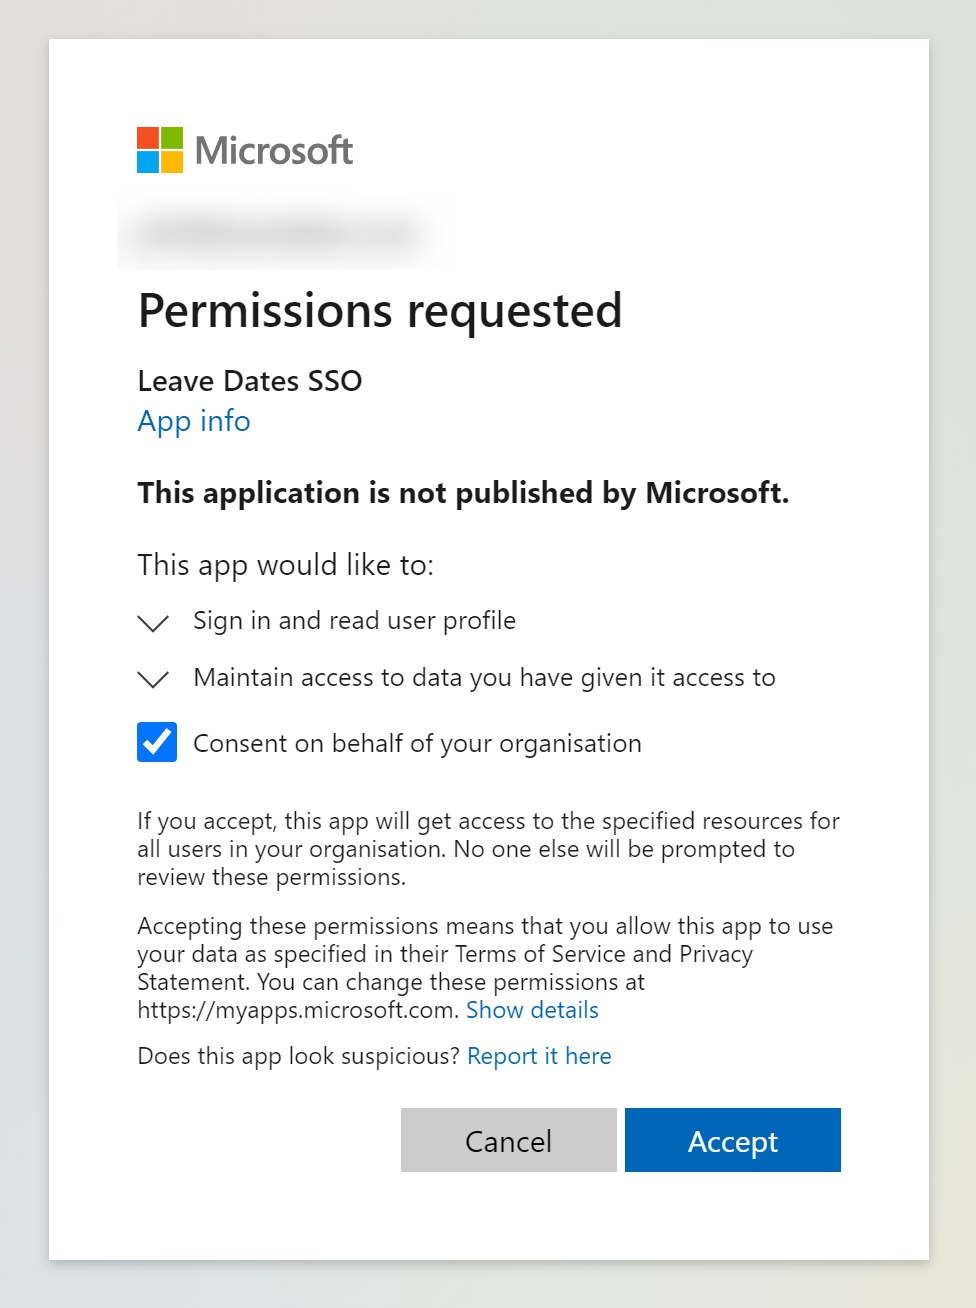
Now you can try to log in using an Entra admin account that also has a Leave Dates user account, and consent to the Permissions requested pop-up.
-
The Enforce SSO login option can be turned on to prevent users from using password login, and force them to use SSO login. If this option is disabled, then users will be able to use both SSO login and password login.


Further considerations
- Users will need to be created in Leave Dates using the same email address as configured for Microsoft Entra.
- Users will need to be invited to use Leave Dates by an admin user, and create an account in Leave Dates using the non-SSO approach (which includes creating a password). This gives them the flexibility to use password login as well if they choose. Users can only log in using SSO once an account has been created in Leave Dates.
- Users will need to be assigned to the Leave Dates application within the Microsoft Entra Portal. Instructions on how to do this are here.
- The Login Url link shown in the table in step 34 above can be used as a direct link for logging into Leave Dates using Single Sign On.
- Alternatively, the user can also log in by clicking Log In on the Leave Dates website, followed by Sign in with SSO and entering the company subdomain (created in step 27 earlier).
- Logging out from Microsoft / Azure will not log you out from Leave Dates.
Common problems
- The most common reason why the SSO setup does not work the first time is due to the incorrect secret value being copied in step 22. Azure gives a Secret ID and a Secret Value, it is important that the Secret Value is used.
- When creating the certificate in step 20, the certificate has an expiry date. If, after some time, you find the SSO integration stops working, this is the most likely cause.
Logo to use for branding
