Manage leave limits
Leave limits enable you to ensure you have a functional team and that work does not slow or delay because multiple people have taken the same day off. With leave limits, you can set the maximum number of people who can take the same day off either in a certain department or across the company.
When a limit is reached, you can block new leave applications or show a warning message to discourage employees from taking leave.
In this article
- Limit how many people can take same day off across the company
- Limit how many people can take same day off per department
- How to set a blackout period ( Block new leave)
- How overlapping leave limits are enforced
- Block new leave applications or show a warning message?
- Leave limits in the wall chart
- Remove leave limits
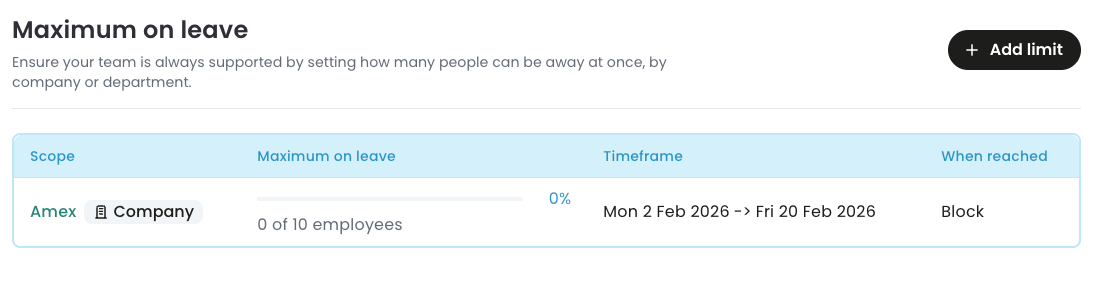
Limit how many people can take same day off across the company
Company-wide leave limits specify how many employees across the company can take the same day off.
To create company-wide leave limits,
- Go to Settings > Limits.
- Select Add limit.
- In Scope, select Company.
- In Maximum on leave, enter a number that is less than the total employees you have in the company.
-
Optional: In From, select the start date when the leave limits should be enforced. And in To, select the end date of the limit. If you leave the start and end dates empty, the leave limit will be until it is removed or updated.
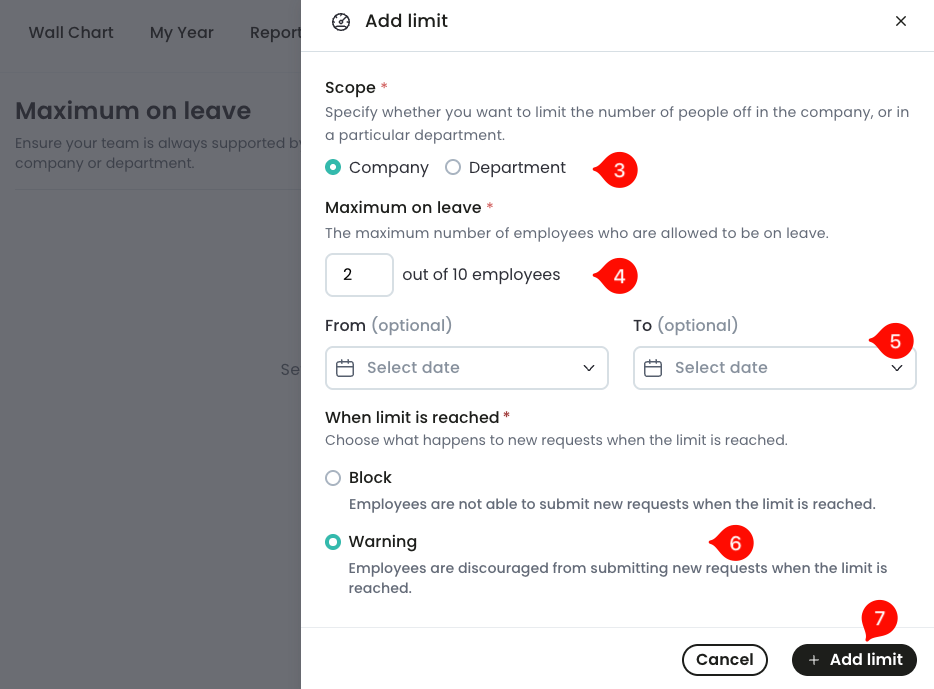
- In When limit is reached, select either Block or Warning.

- Block - this option effectively prevents employees from submitting new leave requests without affecting any existing leave.
- Warning - with this option, employees can still submit new leave requests. However, they will see a warning message indicating that their application exceeds leave limits.
- Select Add limit.
Limit how many people can take same day off per department
- Go to Settings > Limits.
- Select Add limit.
- In Scope, select Department.
- In Department, select the department to which the limits will apply.
-
In Maximum on leave, enter a number less than the total employees you have in the selected department.
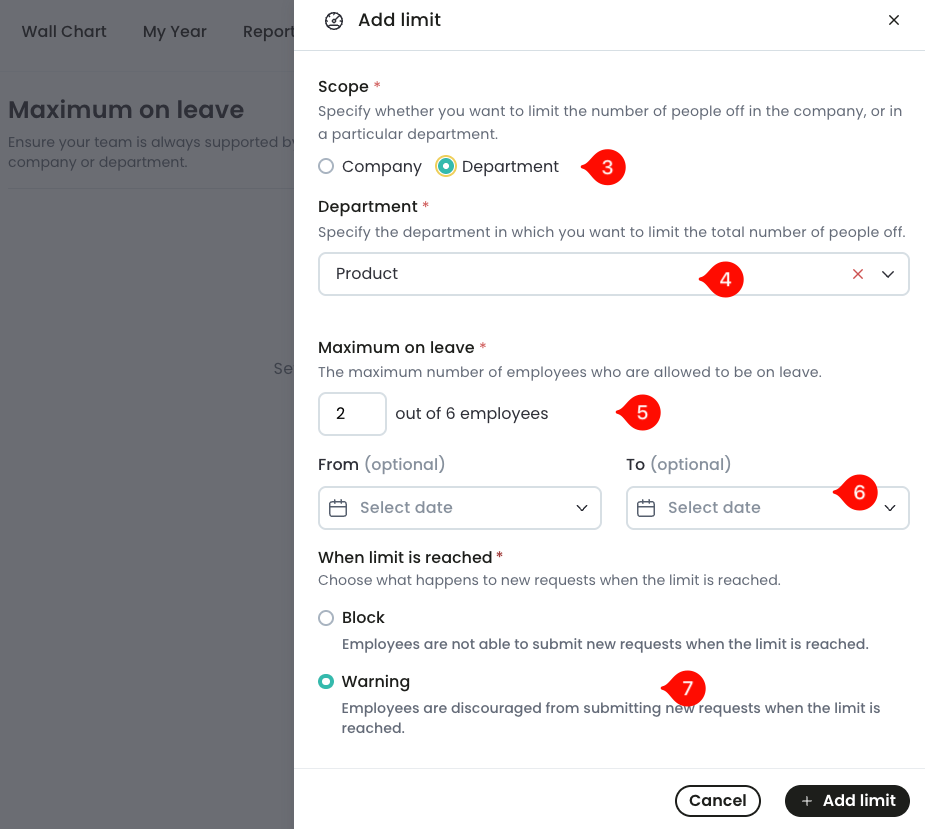
- Optional: In From, select the start date when the leave limits should be enforced. And in To, select the end date of the limit.
- In When limit is reached, select either Block or Warning.

- Block - this option effectively prevents employees from submitting new leave requests without affecting any existing leave.
- Warning - with this option, employees can still submit new leave requests. However, they will see a warning message indicating that their application exceeds leave limits.
- Select Add limit.
How to set a blackout period (Block new leave)
There are situations where the company or department needs all hands on deck. Think about cases of severe staffing shortages, or critical operation periods such as during auditing or product launches. In these and other situations, you may want to temporarily block new leave applications for all employees in a department or across the company.
To facilitate this, you can use Leave Dates to block a portion of the calendar and ensure you have full staff availability. You can set leave limits for a single date or a range of dates and for specific departments or the entire company.
To lock a date or a range of dates to create a blackout period,
- Go to Settings > Limits.
- Select Add limit.
-
In scope, select either Company to block new leave requests across the company, or Department to block new leave requests for a particular department.
You can create multiple leave limits if you want to block leave in more than one department and not across the company.
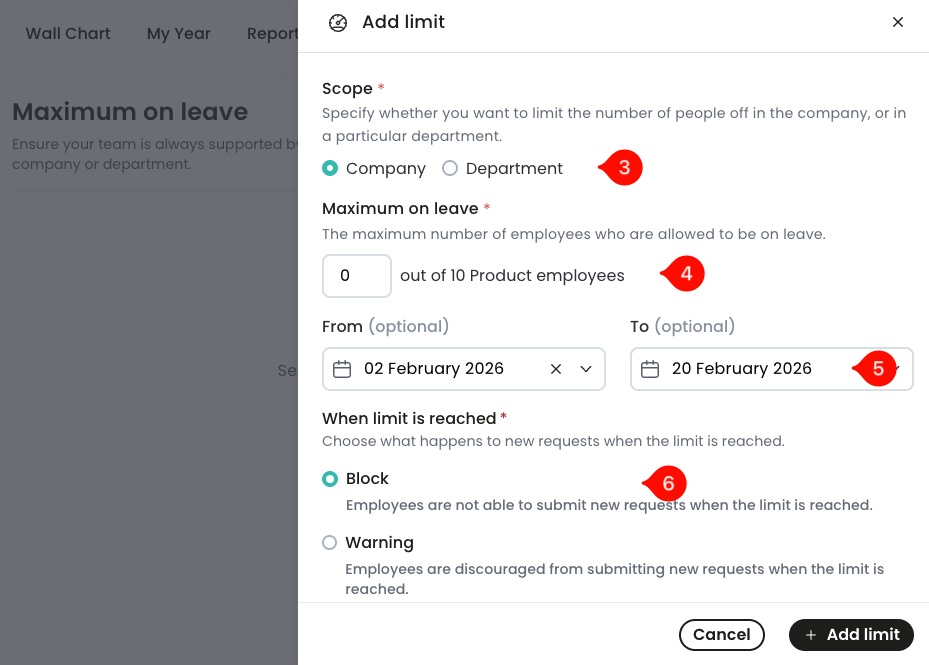
- In maximum on leave, enter zero. This means nobody can apply for new leave in the specified dates. Existing leave is not affected.
- In the From and To date fields, enter the first and last dates when this limit should be enforced. You can use the same date in the From and To and lock just one day or select different dates to lock a range of days.
- In when limit is reached, select Block. This ensures that employees are blocked from applying for leave, thereby assuring you of their full availability during a critical time for the company.
- Select Add limit.

You should communicate upcoming blackout periods with your employees in advance to ensure it does not get them by surprise. It also helps maintain a good working relationships.
How overlapping limits are enforced
In some cases, multiple leave limits may overlap. For example, a company allows up to three people to take the same day off across the entire organization, while also allowing only one person per department to be off on that day. Each limit is evaluated independently. If any of the limits is reached, the system will either block the new leave request or display a warning, depending on how the rule is configured.
Block new leave applications or show warning messages?
When creating leaving limits, managers and employers must make the choice of whether to completely block new leave when the limits are reached or to just show a warning message and give approvers discretion to approve or reject new leave.
And while we cannot say with certainty that one option is better that the other in any situation, we can give you examples of when to use either option.
When to block new leave when limits are reached
- Minimum staffing or safety critical roles - departments where falling below the minimum staffing needs creates a safety risk or legal non-compliance.
- Pre-announced company-wide blackout periods - the employees are notified in advance so there’s no need to make exceptions.
- During high risk business events - for example during system migrations or critical product launches.
- Specialist roles in small teams - you can temporarily block leave for specialist teams where absence cannot be absorbed by other team members.
When to use the warning option
- Teams with flexible scheduling or project based environments
- Partial coverage risks
- Legal compliance
Leave limits in the Wall chart
In the Wall chart, leave limits aren’t displayed unless they have been reached. When reached, leave limits are shown as faint red boxes over the dates for which the limit applies. Limits can either be shown for all employees or for employees in certain departments.

Remove leave limits
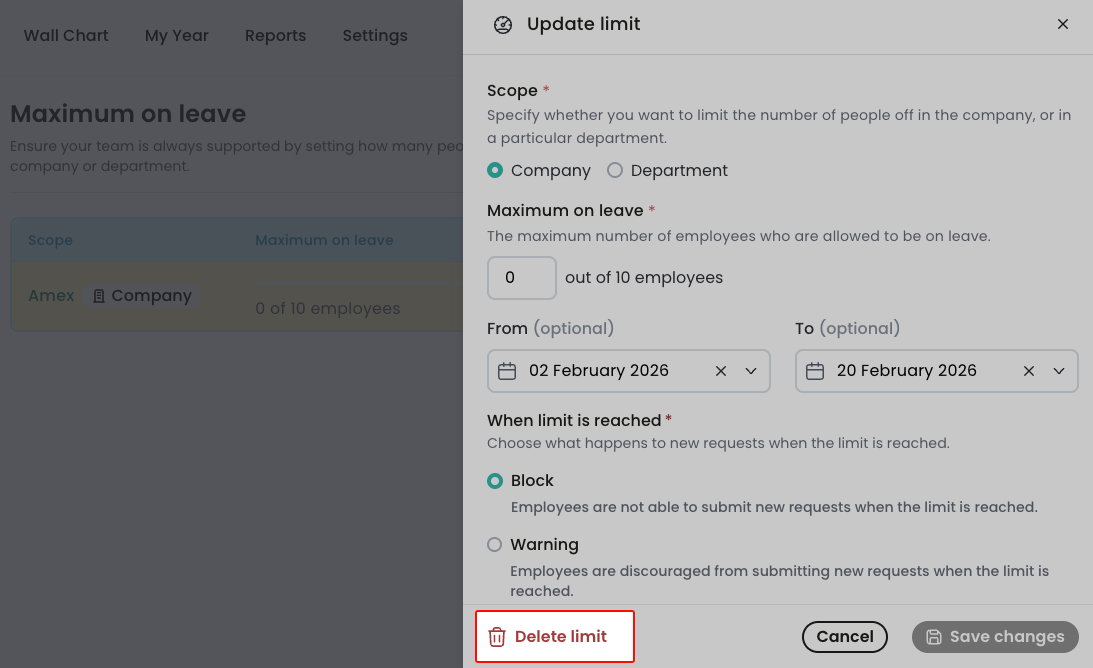
To delete leave limits,
- Go to Settings > Limits.
-
Identify the limit you want to remove and click on it.
-
Select delete limit.