How to create your company’s Maximum leave request policy
Leave Dates lets you control the maximum number of continuous days an employee can request as part of a single leave request by implementing a Maximum leave request policy. This feature is designed to help ensure fair leave distribution, team availability and planning.
Feature availability: With our Plus plan, you have full policy editing rights, enabling you to create your own personalised maximum leave request policy with different rules for each leave type; on the Essential plan, you are able to edit the default policy, which will then be applied to all leave types; on the Starter plan, you cannot edit any of the policy settings (these are configured to the Leave Dates system default) but you can still view all the policies to understand what rules are being applied.
In this article
Open the Maximum leave request policy
Understanding the default maximum leave setting
Customise the default maximum leave request
Set different maximums for individual leave types
Test your maximum leave request policy
Reset the policy to the system default
Open the Maximum leave request policy
To view or change the Maximum leave request policy:
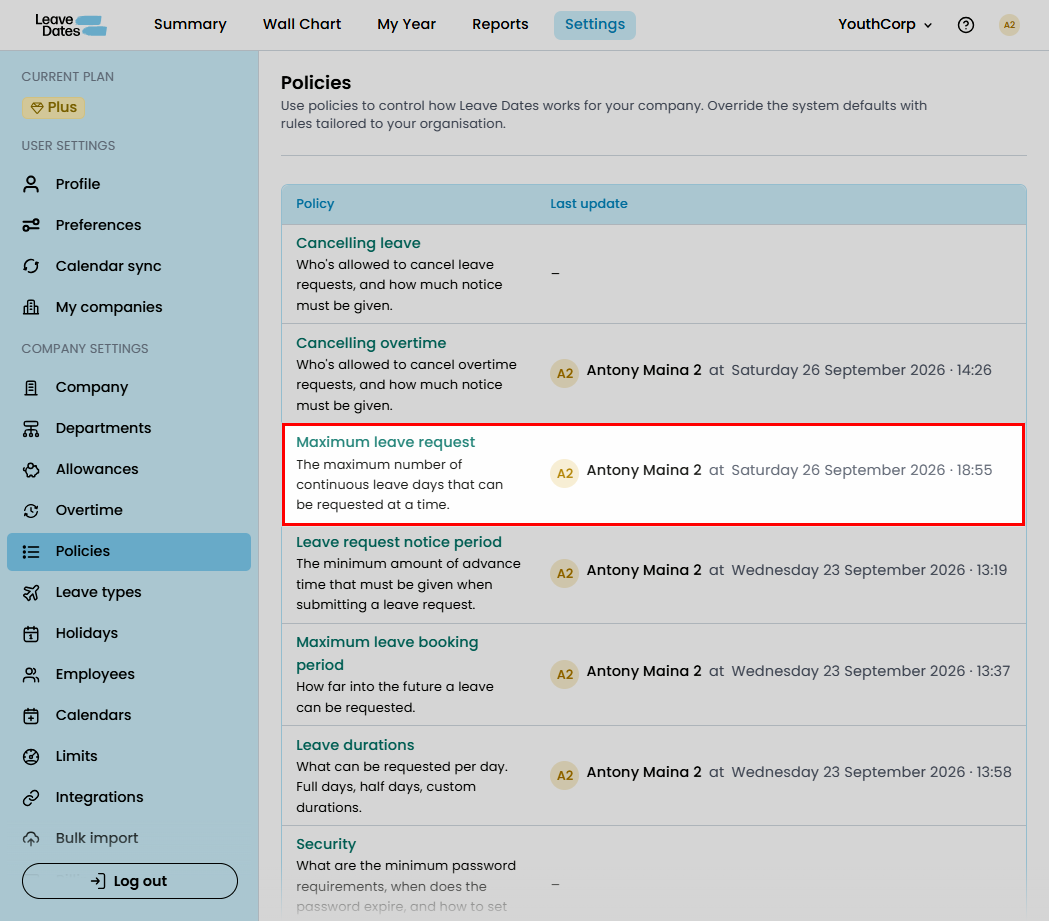
- Go to Settings.
- Select Policies.
- Select Maximum leave request from the list of policies.
Understanding the default maximum leave setting
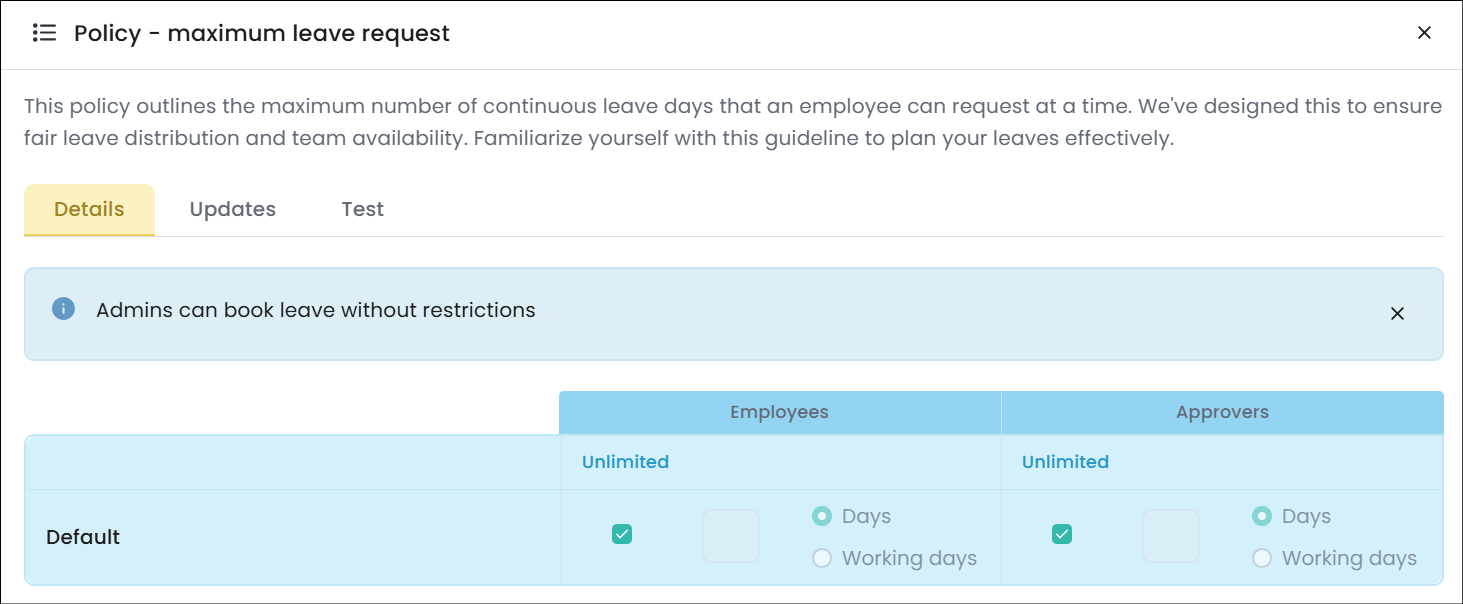
Leave Dates provides a default setting for the maximum length of a continuous leave request.
This system default setting is Unlimited, meaning there is no maximum and single leave requests can be any length (as long as the employees has enough allowance for it). This applies to both employees requesting their own leave and approvers booking leave on behalf of their direct reports.
The maximum leave request policy applies to the length of a continuous request. It does not determine or change an employee's total annual leave allowance.
Customise the default maximum leave request
If the unlimited system default does not suit your organisation, you can change the maximum number of continuous leave days that can be requested and automatically apply this new default to all leave types.
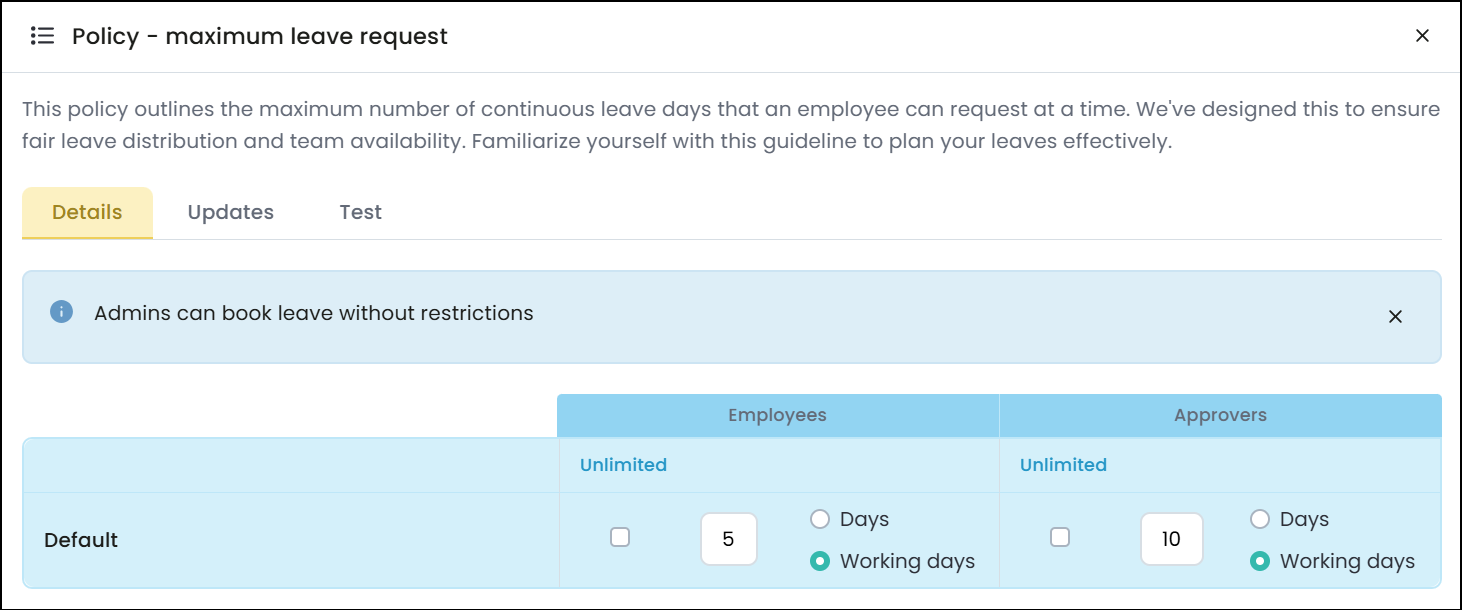
- In the Details tab, change the default setting for all leave types by disabling the Unlimited option - just untick the Unlimited box - and then enter the maximum number of days you want to allow.
- Choose whether the limit should be measured in:
- Days, or
- Working days.
- Decide whether you want to change the setting for just employees or also for approvers booking leave for their direct reports (the number of days can be different for employees v approvers if required).
- Any changes you make to the default setting will be instantly applied to all leave types with the Use default box selected.
- Once you’ve edited the policy, click Save changes and the new settings take effect immediately.
We recommend giving employees the most restrictive permissions, with progressively greater permissions for approvers and admins. If you configure employees with higher permissions than approvers, you’ll get a warning message because the Leave Dates system will know this is likely to cause issues. There are no restrictions on leave booked by admins so they will always have the highest permissions.
Understanding Days vs Working days
When setting a maximum leave request, it's important to understand the difference between days and working days.
- Days - the maximum is based on the total number of calendar days in the requested period, including working and non-working days (and holidays).
- Working days - the maximum is based only on the employee's working days within the selected period (this might vary between employees according to their specific working schedule).
For instance, if you set the maximum to 5 working days, an employee could request a continuous leave booking that ran from Wednesday right through to the following Tuesday (7 days total, but only 5 working days if the weekend days are non-working days on their schedule). But if your maximum was 5 days, this leave request wouldn’t be permitted.
Set different maximums for individual leave types
You may want different leave types to have different maximum request lengths.
For example, your company might want most leave types to follow the same default maximum but set a lower limit for unpaid and study leave..
To create an exception:
- Open Settings > Policies > Maximum leave request.
- Find the relevant leave type in the list.
- Disable Use default for that leave type by unticking the box.
- If the Unlimited option is selected, disable this by unticking the box.
- Enter the maximum number of days allowed.
- Select Days or Working days.
- Select Save changes.
The leave type will then use its own maximum instead of the company default.
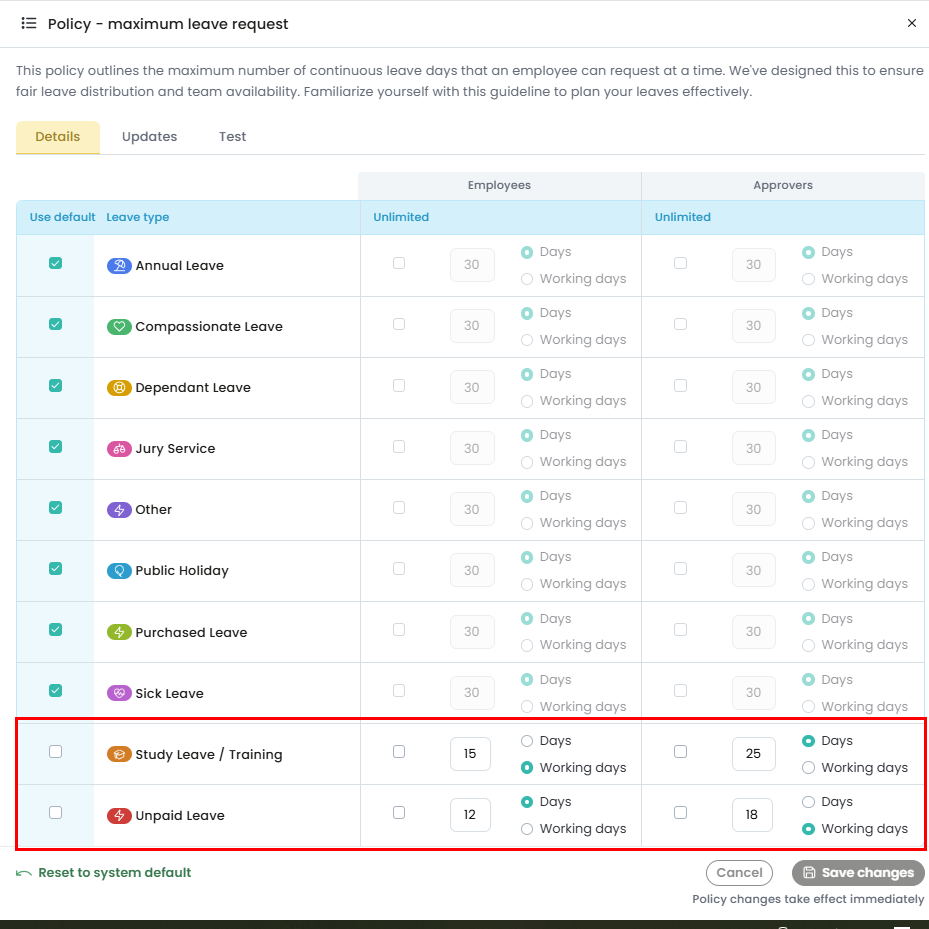
This allows you to keep a consistent company-wide rule while making exceptions for certain types of leave where required.
Leave Dates automatically switches a leave type back to Use default when its configuration matches the company default. This can happen when you manually change the settings for a leave type, but the settings you’ve chosen actually match the default. Or if you change the default settings and they now match changes you previously made to individual leave types. This prevents unnecessary duplicate configurations and keeps genuine exceptions clear.
Review policy updates
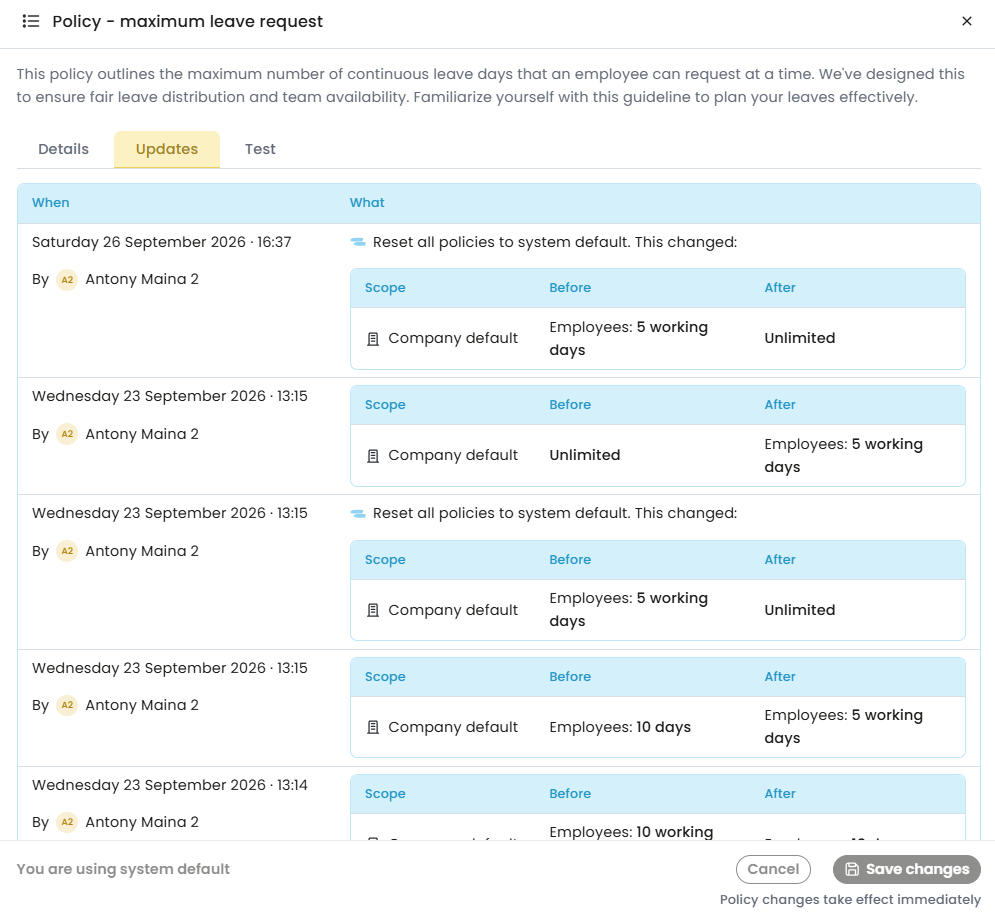
The Updates tab provides an audit trail of changes made to your Maximum leave request policy. Every change is recorded as an event in the timeline, with no exceptions. The events are never deleted or modified. You can use this information to check when a setting changed, who made the change, and how the policy was affected.
This is particularly useful when you need to confirm when a policy changed or understand why a leave type now follows a different rule.
The update history displays the following information:
- When: The date and time the change was made.
- Who made the change: The user responsible for the update.
- What changed: A description of the policy change, including any affected leave types (defined in Scope).
- Before and After: The previous setting and the new setting, allowing you to compare the changes.
If the user who made a change is later deleted from Leave Dates, their name may appear as “(Deleted)”, but the event itself remains in the audit trail.
Test your maximum leave request policy
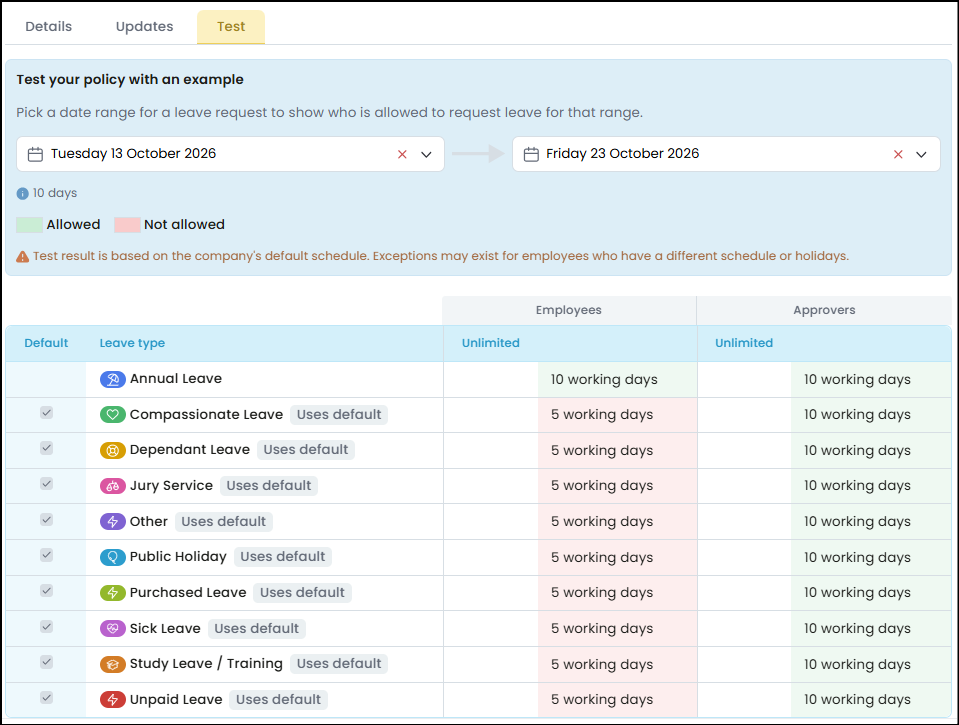
Before relying on your policy settings, use the Test tab to check whether a particular continuous leave period is allowed under the current policy.
Testing lets you confirm how your maximum limits apply across different leave types before employees or approvers begin making requests. It is also quicker than manually creating leave requests to check how the policy works.
The Test tab allows you to select a start date and an end date for a leave period. Leave Dates then displays the applicable maximum for each leave type and indicates whether the selected period is allowed.
To test your policy:
- Open Settings > Policies > Maximum leave request.
- Select the Test tab.
- Select the start date for the leave period.
- Select the end date.
- Review the number of days in the selected period.
- Check the results for the different leave types.
- Confirm whether the request is shown as Allowed or Not allowed.
The test result is based on the company's default working schedule. Individual employees with different working schedules or bank holidays may have different results.
Reset the policy to the system default
If you no longer want to use your customised maximum leave request settings, you can return the policy to its system default.
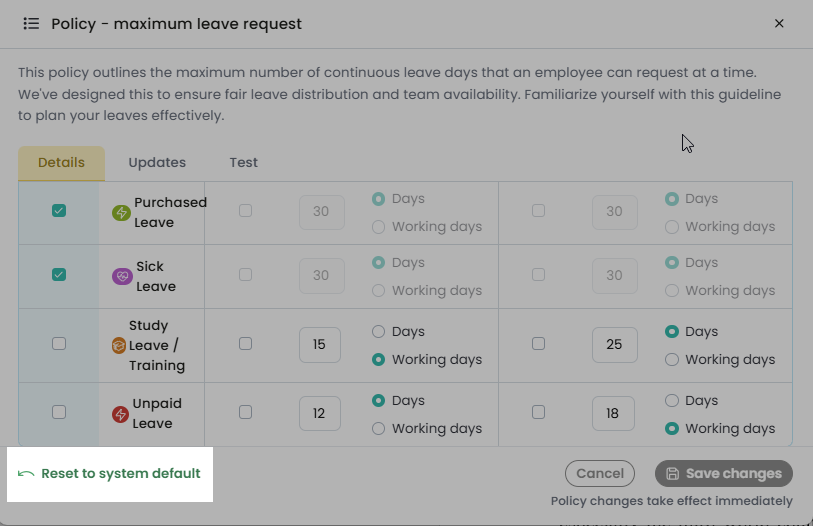
The policy interface includes Reset to system default at the bottom of the policy window.